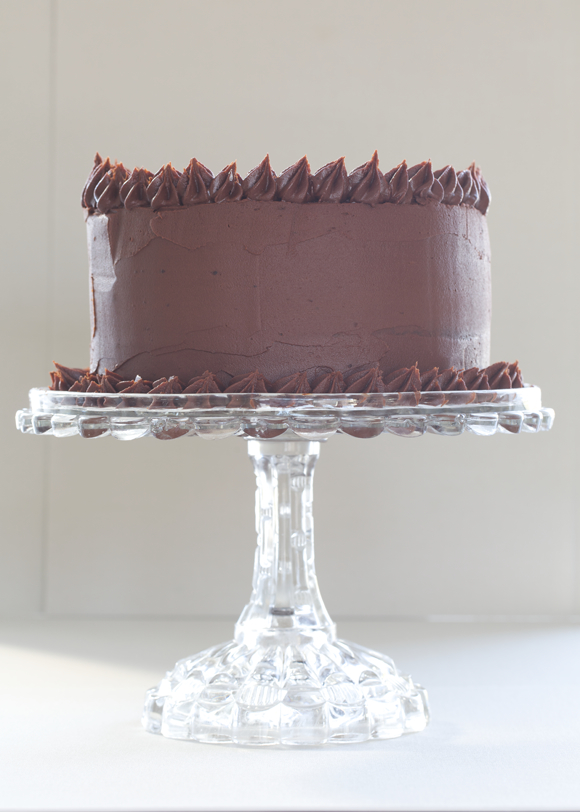
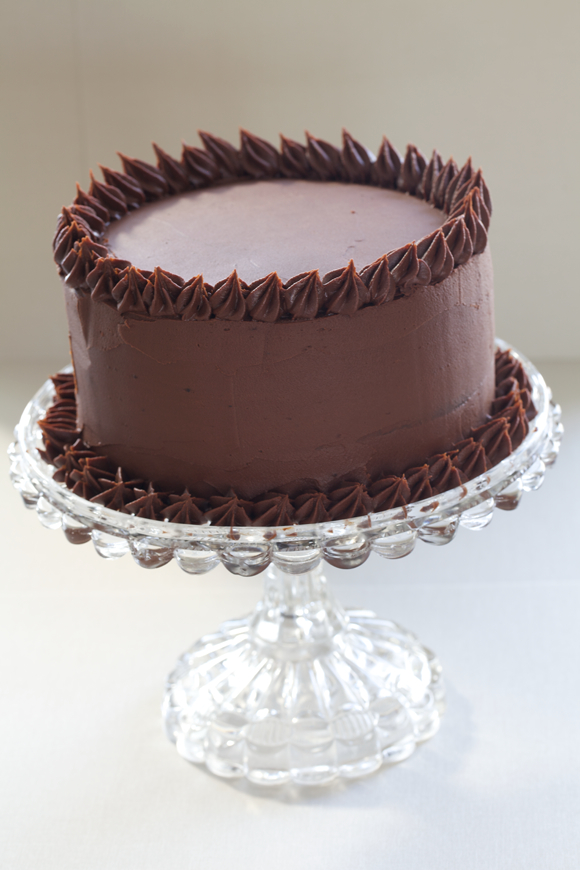
 This cake has been part of our repertoire for more than a decade; I bet I’ve made it more than 20 times now. It’s from an era when I still cooked and baked from recipes, and one of the rare ones I still pull off the shelf. I make other chocolate cakes, of course, but I find myself returning to this one when we want something understated and bittersweet. I made it for a hen’s night with friends most recently and we ate it with earl grey ice cream, but my Sweet Boy and I celebrated the end of an era with the last slices, straight from the refrigerator with a glass of cold milk, when he got his driver’s license.
We’ve spent a lot of time together in the car these past 18 years: in car-related antics, in conversation, braving bad weather together, and learning to drive. When he and my Honey Girl were little and my Dear Husband’s frequent travel was upsetting to them, we had a set of rituals, for just the three of us, things we would do together only when he was away. It was a way to offset the pain of his departure just a little, and one of the favorites was that during these weeks I would sing ridiculous songs at the top of my lungs in the car as we drove, as many as they requested. Oh how they would giggle in the back seat. We were in a grocery store parking lot one such afternoon and I was singing, in my best Louis Armstrong, “Roll out the Barrel.” My Honey Girl and my Sweet Boy were cheering, “Louder! Louder!” and laughing so hard they bucked against the back of the seat and forward until the seat belts caught them; I was surprised they could get the words out. Then I realized that there were pedestrians in the parking lot looking at me rather strangely as they made their way to cars with carts. They had rolled down the windows in the back of the car. Still, at 21 and 18, they’ll roll down the windows in the car and ask if I’ll do it again. And I’m grateful whenever that happens because it brings us back to that time together, which is ending.
I won’t be driving my Sweet Boy anymore. Won’t be listening to Wiz Khalifa and Mod Sun and all of his music. And he won’t be listening to mine anymore—at least together in this way. I’ll go back only in memory now. To the car pranks, to barreling towards the brick wall of the middle school the first day we set out to learn to drive together, to listening to his stories and concerns. He still comes on errands with me sometimes, but our time together in the car is largely over.
Freddy had just turned six when I first made this cake; he had just finished Kindergarten. Now he’s 18 and has just graduated from high school. There are other cakes that have become part of the family, but this one feels like his. I’ve made it with him in mind almost every time it’s gone into our oven, even for the hens’ night, since I knew he would be here for a slice. This is for you, Freddy. Make it often on your own now, and I’ll make it whenever you’re home.
*Postscript: I found Annie, our little terrier, in my desk chair, licking the cake plate on my desk with her paw on my keyboard. “Mmmmmmmm,” she typed on the recipe. Indeed.
Cake Tips
- To line the cake pans with parchment, trace the bottom of a pan onto a sheet of parchment. Then stack three sheets and cut all three circles at once. Butter the pans, smearing evenly with your fingers or a paper towel or a butter wrapper over the bottom and sides of the pans. Then place the parchment in the bottom of each pan upside down, so to speak, so that it does not curl upwards. Butter parchment gently, holding it in place with one hand while you butter with the other. Finish by tapping a couple of tablespoons of cocoa into the first pan. Working over a garbage bin, shake the cocoa over the bottom of the pan and then tip it so that the cocoa comes to rest on the side of the pan. Rotate the pan 360 degrees until the cocoa has coated the sides of the pan. Then tip the cocoa into the next pan and repeat. When you finish the third pan, tap any excess cocoa into the bin.
- Measure your flour according to the directions for each recipe you use. Weighing flour is the most accurate method, but, alas, almost no American recipes indicate weights. If the recipe does not indicate a measuring technique, check the front of your cookbook. Cookbook authors frequently include a section on basics and ingredients. There may be notes on whether flour for their particular recipes should be scooped and leveled, lightened and scooped, or spooned in. Scooping and leveling is the heaviest measure of flour—just plunge your cup into your flour container, bring up a heaping cupful, and level it with a knife or other flat implement. To lighten flour before measuring, run a fork or whisk through flour. Then scoop gently and level. To spoon in, simply lift tablespoons of flour from container to cup and level it. For this recipe, I lighten the flour, scoop, and level.
- For a slightly more refined texture, sieve the flour when you add it to the cake. You can certainly skip this step. Sometimes it feels a bit fussy to sift dry ingredients, and the cake will be delicious whether or not you bother.
- It’s important that you not overbeat cake batter when you add the dry ingredients. You can beat it vigorously and without adverse affect when you are bringing together butter and sugar and other wet ingredients early in a recipe. But when you add the flour, be especially gentle with it. Beat it until it is incorporated, watching carefully and mindfully. Once the flour has disappeared, stop beating. If you overbeat batter at this point, the result will be a tough cake.
- I usually bake the cakes ahead. You may wrap them tightly in cellophane and then aluminum foil and freeze them. Allow them to thaw at room temperature. Or bake them the day before you’ll frost the cake, and keep them in the refrigerator wrapped tightly in a double layer of cellophane. You may make the entire cake up to three days before you will serve it. I almost always bake the cakes day one, frost them day two, and serve them day two or day three. The cake will keep after it is frosted for about three days.
- Frosting a chilled cake is much easier than frosting one at room temperature, as the texture of the cake is firmer.
Ganache Tips
- If you overchill the ganache, let it come towards room temperature. It is best to pay attention during its initial cooling process, as it will have a creamier appearance and mouthfeel if you don’t overchill it. Don’t fret. It’s delicious even if it gets a bit too chilly. It will just look a bit drier on the finished cake.
- If you’re new to frosting or you want an especially smooth finished cake, smear a thin layer of ganache onto the sides of the cake and place the cake in the refrigerator for half an hour. Then add a thicker layer of ganache, smoothing it or swirling it with an offset spatula or knife as you turn the cake plate.
- The cake will be lovely and delicious whether you choose an informal and haphazard swirled frosting method or a perfectly smooth finish. Don’t be intimidated by frosting. This cake is so delicious that no one will mind if its appearance is casual.
Cocoa Cake with Bittersweet Ganache
Adapted from Gourmet magazine, June, 2001
Yield: one eight-inch, three-layer cake; about 12 servings
Ingredients:
1 c. unsalted butter, softened but cool
2 c. brown sugar
4 eggs
½ c. Scharfenberger* cocoa, plus extra for dusting the cake pans
¾ c. hot water
½ c. whole milk
2 t. Kalhua* coffee liqueur (optional) (or substitute 1 t. vanilla extract)
2 c. all purpose flour (I prefer King Arthur*.)
pinch of salt
1 ¼ t. baking soda
…
21 ounces Lindt* bittersweet chocolate (white wrapper), ground in a food processor or chopped into fine slivers with a sharp knife
2 ½ c. plus 2 T. heavy cream
*I’ve listed specific brands in this recipe as I’ve made this cake dozens of times and it turns out best using these ingredients. You may substitute others if you wish, of course.
Method:
Cocoa Cake
- Preheat your oven to 350 degrees F.
- Butter three 8-inch cake pans. Line them with parchment paper, butter the paper, and then coat them evenly with cocoa powder. Tap off the excess cocoa over a garbage bin and set them aside.
- In a large bowl or the bowl of an electric mixer, beat together the butter and brown sugar until they are pale and lofty.
- Add one egg at a time, beating well between additions.
- In a medium bowl, whisk together the cocoa, water, milk, and coffee liqueur.
- Run a fork or whisk through the flour in your bag or container. Add one cup of flour, the baking soda, and the salt to the butter and sugar mixture and beat it until it is nearly incorporated.
- Add half the cocoa liquid and beat it until it is nearly incorporated.
- Add ½ c. flour and beat gently until nearly incorporated.
- Add the remaining cocoa liquid and beat until nearly incorporated.
- Add the last ½ c. flour and beat until just incorporated.
- Divide the batter evenly between the three pans and smooth their tops with a spatula.
- Place two of the cakes on the top rack in your oven and the third on the middle rack.
- Bake for 10 minutes. Then rotate the cakes on the top rack to the middle of the oven, and the cake in the middle to the top. Bake for 10 minutes. The cakes in the middle of the oven will likely be done at this point, and the cake on the top rack will need about an additional two minutes. To check the cakes for doneness, insert a thin toothpick into the center of each cake. It should have only a moist crumb or two clinging to it. The tops of the cakes will also appear dry and spring back when pressed lightly with a fingertip. Allow the cakes to cool in their pans.
Ganache
- In a large saucepan, heat the cream until it is hot but not yet at a simmer.
- Remove the cream from the stove and stir in the chocolate until it is melted and uniformly smooth.
- Pour the ganache into a large bowl and place it in the refrigerator. Stir the ganache periodically and check its texture. It will take between one and three hours to bring it to a good spreading consistency, depending on the temperature of your refrigerator and the surface area of your bowl. When it is creamy and spreadable, frost the cake.
Frosting
- When the ganache is ready and the cakes completely cool, place a bit of ganache on the center of your cake plate. Center a cake over it, flat side up. You may tuck in strips of parchment or waxed paper around the cake so that your plate remains clean if you wish.
- Place a dollop of ganache on top of the cake, perhaps ½ cup. Spread it evenly over the top of the cake. No need to bother with the sides of the cake yet.
- Place another cake layer on top and repeat the process.
- Finish with the third layer of cake, flat side up.
- Frost the sides of the cake with a thick layer of ganache, smoothing it with an offset spatula as you turn the cake plate.
- I usually fill a pastry bag with the remaining ganache and decorate the top and base quickly, though it’s unnecessary.
- I keep this cake in the refrigerator. Bring it to room temperature before serving, which improves its texture, or eat it straight from the refrigerator, which is also delicious.
- The cake requires no accompaniment, but barely sweetened whipped cream and ice cream are nice additions. I have divided the cake layers in half and added very thin layers of ganache between each to make a six-layer cake, and I have also added a thin layer of homemade raspberry jam or lemon or tart orange curd to the layers before adding the ganache. Delicious.










{ 17 comments… read them below or add one }
The cake is just beautiful…as beautiful as the story. My eyes are filled with tears reading this. My daughter is 18 and we are counting the weeks until she leaves for college. I thank goodness every day that she opted to go away only 3 hours. Now, I am at the beginning of the driving lessons with my son (who is 15). He is so panicked in the car which is sort of how he handles life “a bit panicky”. It’s going to be several years of practicing I think before he is truly ready (and willing) to take off on his own. I just loved this article…so many similarities to our family.
Sarah,
Thank you so much. I’m so touched. My two will be on opposite coasts come the end of the summer; I’m envious of your proximity to your daughter. I hope you have a wonderful summer together.
Beautiful – I see this becoming part of my repertoire, too. Though I’ve gotta say – your understated chocolate cake is a whole lot more.. uhh… STATED than my usual
You’re funny, Lizzi. xo
Laura,
Your posts often bring tears to my eyes and watering to my mouth, but this one more than ever. As both our Sweet Boys head off to college this fall and my younger Sweet Boy begins to learn to drive, I will think of this writing and smile through the tears…
Thank you for sharing your gifts with all of us!
Vicki,
Thank you so much. That means so much to me. xo
Aww. What a sweet story
I still love riding along in the car with my mom. Especially now that I’m off at school myself. I feel it’s where we have our best conversations.
Oh Man. This cake looks amazing. I love chocolate.
And the story is beautiful.
xoxooxox
Kaitlin,
Thank you. It’s so sweet to hear that.
Kris,
Thank you. xox
Miss your posts Laura! Hope you are well. Happy Christmas with love from Ireland.
Imen, Thank you. xo
Hi Laura,
I have so enjoyed reading your blog over the last week. You photos and recipes are truly inspiring. I wonder, are you blogging on a different site, or just taking an extended break?
Even though I’ve only recently discovered your blog, I can say I already miss you and hope to see some new posts someday in the future.
~Caroline
Caroline, Thank you so much. That is so kind of you and so touching to me. I haven’t posted in a long time now and the months have flown past. I am working on designing a new blog, to be called A White Apron, which I hope to launch late winter/early spring.
Hi Laura,
I keep coming back to your blog, hoping you have started posting again.
I see from other comments I am not the only one who enjoys your writing style and recipes. I hope you will still be starting the blog you mentioned in your reply to Caroline and if so, will you post a link on this site?
-Jennifer
I just realized I listed my email address incorrectly but gave the correct one with this new comment
Jennifer,
Thank you. I am so touched by your message. I hope to start working on a design for the new domain this month. It’s a slow process for me; working on CSS and HTML coding is the equivalent of a toddler in the kitchen, but I love learning and the process, despite its agonizingly slow pace. I will post a link when it’s up. Thank you for your kindness. I appreciate it more than you can imagine. xx